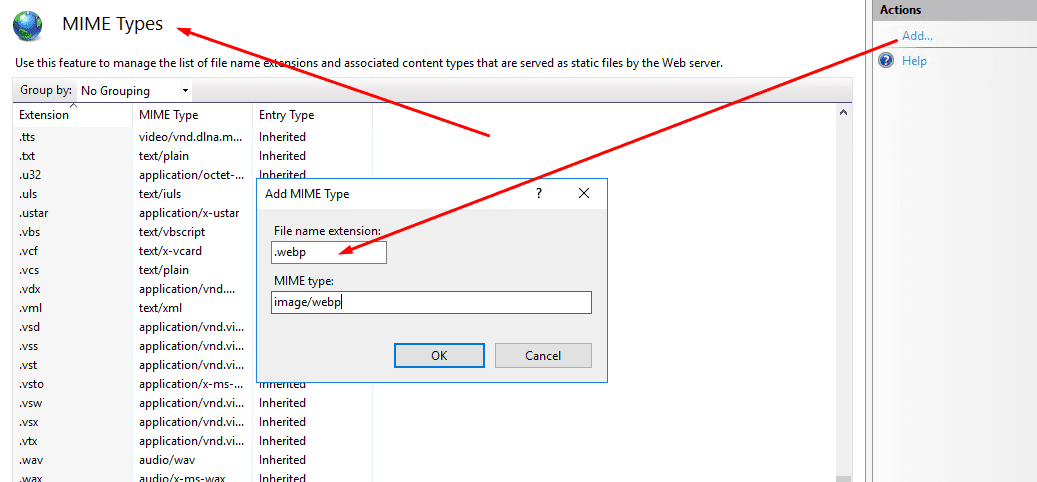
By default, Internet Information Services (IIS) does not support serving .webp files out of the box. However, you can enable support for .webp files in IIS by following these steps… (jump to number 3, which might be all that you need!):
- Install the WebP image extension: Download and install the WebP image extension for IIS from the official Microsoft website (https://www.microsoft.com/web/handlers/webpi.ashx?command=getinstallerredirect&appid=IISWEBMEDIAEXTENSION). This extension adds support for serving .webp files.

- Enable the WebP module in IIS: Open the IIS Manager on your server and navigate to the server level or site level where you want to enable .webp support. Double-click on the “Modules” feature and click “Add Managed Module” from the right-hand actions pane. Enter a name for the module (e.g., “WebPModule”) and specify the following settings:
- Type: Managed Handler
- Precondition: Integrated mode
- Path: C:\Windows\System32\inetsrv\webp.dll
- Entry Type: Local
- Add the MIME type for .webp files: In the IIS Manager, select the server or site level, and open the “MIME Types” feature. Click “Add” from the right-hand actions pane and enter the following details:
- File name extension: .webp
- MIME type: image/webp

- Restart IIS: To apply the changes, restart the IIS service or recycle the application pool associated with your website.
After completing these steps, IIS should be configured to serve .webp files. You can test it by accessing a .webp file hosted on your server through a web browser. If everything is set up correctly, the .webp image should be displayed.
Auto Amazon Links: Could not resolve the given unit type, . Please be sure to update the auto-insert definition if you have deleted the unit.
Note: It’s essential to ensure that your website’s visitors have compatible web browsers that support the .webp format. If a browser does not support .webp, the image may not be displayed correctly. You can consider providing fallback options or using JavaScript techniques to handle compatibility for unsupported browsers.


![[High Quality] - The Bamboo stakes are made of high quality natural bamboo.It’s very strong and durable,great for plant support!Each stakes is inspected manually to ensure quality. [Multipurpose Use] - Perfect for indoor and outdoor plants.It's great...](https://m.media-amazon.com/images/I/51zEDOHJvML._SL160_.jpg)


